Installing a ground rod clamp for electrical grounding can be done in easy steps. Ground rod clamps are an essential component of electrical grounding systems, providing a secure connection between the grounding conductor and the ground rod.
Proper installation ensures effective grounding and helps protect against electrical hazards. In this guide, we will outline a simple and straightforward process for installing a ground rod clamp. By following these steps, you can ensure a safe and reliable grounding system for your electrical circuitry.
So, let’s get started and learn how to install a ground rod clamp in just a few easy steps.
Importance Of Ground Rod Clamp In Electrical Systems
Grounding is an essential safety measure for electrical installations, ensuring the protection of both people and equipment. One crucial component of grounding systems is the ground rod clamp. This small yet crucial device plays a crucial role in ensuring proper electrical grounding. In this article, we will explore the importance of the ground rod clamp in electrical systems and provide easy steps to install it effectively. Let’s dive in!
Grounding: An Essential Safety Measure For Electrical Installations
Before delving into the role of the ground rod clamp in electrical systems, let’s understand why grounding is an essential safety measure. Electrical grounding involves connecting electrical circuits or equipment to the earth to prevent the build-up of excessive voltage and to provide a safe path for electrical current in the event of a fault.
By grounding electrical systems, we can prevent electrical shocks, protect sensitive equipment from voltage surges, and minimize the risk of electrical fires. Whether in residential, commercial, or industrial settings, proper grounding is paramount to ensure the safety and efficiency of electrical systems.
Understanding The Role Of Ground Rod Clamp In Grounding Systems
The ground rod clamp is an indispensable component of electrical grounding systems. Its primary function is to establish a secure and low-resistance connection between the ground rod and the grounding conductor, typically a copper or aluminum wire.
The ground rod clamp serves as the critical link between the ground rod, which is buried deep in the earth, and the grounding conductor, which is connected to electrical panels, equipment, or structures. This connection ensures the proper dissipation of electrical current into the ground, promoting electrical safety.
When it comes to installing a ground rod clamp for electrical grounding, following the correct steps is crucial to ensure its effectiveness. Here are some easy steps to help you install a ground rod clamp:
- Choose the proper location for the ground rod, considering factors such as soil moisture, accessibility, and proximity to the electrical system.
- Dig a hole deep enough to accommodate the ground rod, typically around six to eight feet.
- Insert the ground rod into the hole until it reaches the desired depth, leaving only a few inches exposed above the ground.
- Attach the ground rod clamp securely to the exposed portion of the ground rod.
- Strip the insulation from the grounding conductor wire and attach it to the ground rod clamp using an appropriate method, such as a bolt or a screw.
- Ensure a tight connection by tightening the bolt or screw securely.
- Test the continuity of the connection using a ground resistance tester or a multimeter to ensure a low-resistance path to the earth.
By following these simple steps, you can install a ground rod clamp effectively, contributing to a robust and reliable electrical grounding system.
Understanding Ground Rod Clamp: Types And Materials
When it comes to electrical grounding, one crucial component that you cannot overlook is the ground rod clamp. This small yet essential device ensures a secure connection between the grounding conductor and the ground rod, enabling the dissipation of electrical charges and preventing hazardous situations like electrical shocks or fires.
Different Types Of Ground Rod Clamps And Their Applications
Ground rod clamps come in various designs, each suitable for different applications. Understanding the different types can help you choose the most appropriate clamp for your specific grounding needs:
1. Acorn Ground Rod Clamps
Acorn ground rod clamps are one of the most common types available and are designed for general-purpose grounding. These clamps have a hex or square head bolt that provides a tight and secure connection to the ground rod. They are typically made of copper, bronze, or copper alloy, allowing for excellent conductivity and corrosion resistance.
2. Split Bolt Ground Rod Clamps
Split bolt ground rod clamps provide a reliable connection between the grounding conductor and the ground rod. As the name suggests, these clamps feature a split bolt construction that allows for easy installation and removal. Split bolt clamps are commonly used in applications where the ground rod needs to be periodically disconnected, such as in lightning protection systems.
3. Exothermic (CADWELD) Ground Rod Clamps
Exothermic ground rod clamps utilize a specialized welding process to create a permanent, low-resistance connection between the grounding conductor and the ground rod. By melting a copper alloy powder, the clamp forms a molecular bond, ensuring excellent electrical conductivity. This type of clamp is often used in critical grounding applications, such as telecommunication towers or power substations.
Choosing The Right Material For Optimal Grounding Effectiveness
When selecting a ground rod clamp, considering the material used is crucial to optimize the grounding effectiveness. The two most common materials for ground rod clamps are copper and bronze. Here’s a comparison between the two:
| Material | Advantages | Disadvantages |
|---|---|---|
| Copper | Excellent conductivity | Susceptible to corrosion |
| Bronze | Good conductivity and corrosion resistance | Slightly lower conductivity than copper |
Depending on the specific environment and the level of corrosion resistance required, you can choose the material that best suits your needs. Regardless of the material, it’s crucial to ensure a secure and tight connection between the ground rod clamp and the grounding conductor to maintain optimal grounding effectiveness.
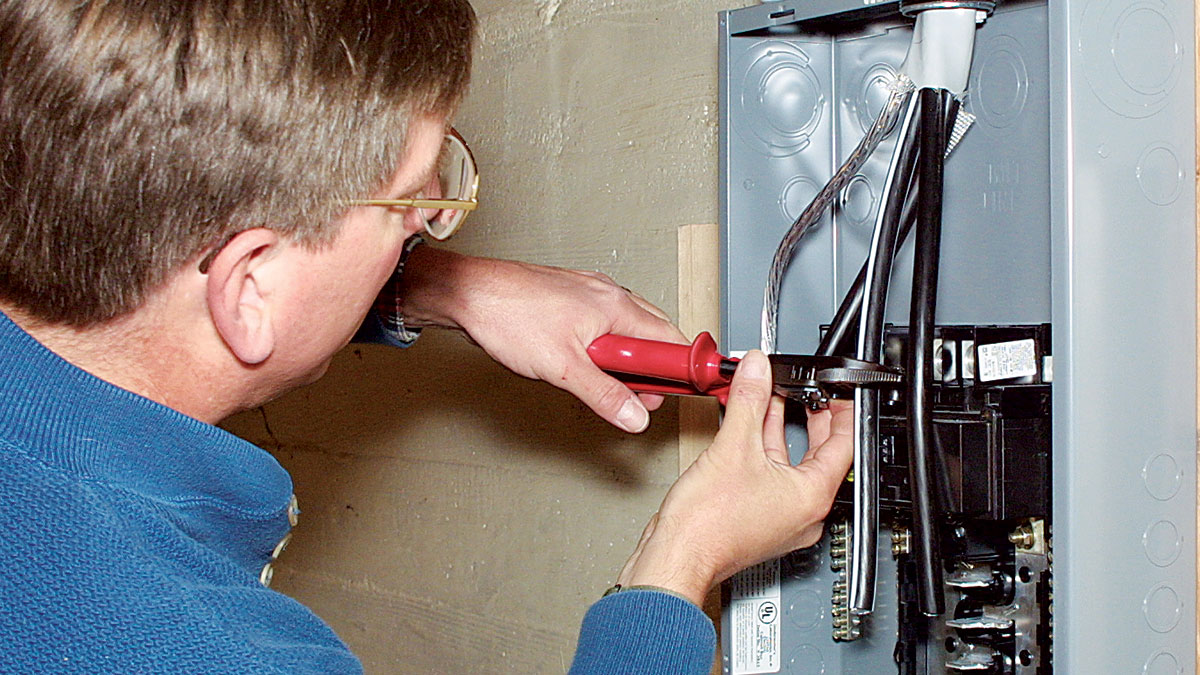
Step-by-step Guide For Installing Ground Rod Clamp
When it comes to electrical grounding, the installation of a ground rod clamp is a crucial step. The ground rod clamp provides a secure and reliable connection between the grounding conductor and the grounding electrode, ensuring the safe dissipation of electrical energy. In this guide, we will take you through the easy steps to install a ground rod clamp for electrical grounding. Let’s get started!
Preparing For Installation: Gathering Necessary Tools And Equipment
Before diving into the installation process, it is important to gather all the necessary tools and equipment. Here is a list of items you will need:
|
Make sure to have all these tools and equipment ready before starting the installation process to ensure a smooth and efficient installation.
Locating The Ideal Position For The Ground Rod Clamp
The next step in the installation process is to locate the ideal position for the ground rod clamp. Follow these steps:
- Using the measuring tape, measure the distance between your electrical panel and the desired location for the ground rod clamp.
- Mark the chosen location with a pencil or marker.
- Once marked, use the drill to create a hole at the marked spot. The hole should be deep enough to accommodate the ground rod clamp, ensuring a snug fit.
By following these steps, you will locate the perfect position for installing the ground rod clamp, optimizing the effectiveness of your grounding system.
Proper Installation Techniques For Secure And Reliable Grounding
Now, let’s move on to the final step – the proper installation of the ground rod clamp. Follow these techniques for a secure and reliable grounding connection:
- Insert the ground rod into the hole created in the previous step, ensuring it goes as deep as possible into the ground.
- Secure the ground rod in place by using the hammer to gently tap it down until it is firmly positioned.
- Take the ground wire and strip the insulation from both ends using the wire stripper.
- Attach one end of the ground wire to the ground rod clamp using a wrench or pliers, ensuring a tight and secure connection.
- Connect the other end of the ground wire to the grounding conductor in your electrical panel.
- Double-check all connections to make sure they are secure and properly tightened.
By following these installation techniques, you can rest assured that your ground rod clamp is securely and reliably connected, ensuring an effective electrical grounding system.
Common Mistakes To Avoid During Ground Rod Clamp Installation
When it comes to installing a ground rod clamp for electrical grounding, it is crucial to follow the proper steps and techniques to ensure a secure and effective connection. However, there are some common mistakes that people often make during the installation process, which can lead to potential safety hazards and inefficiencies in the electrical system. In this section, we will discuss two significant mistakes to avoid while installing a ground rod clamp.
Over-tightening Or Improper Connection Techniques
One of the most common mistakes during ground rod clamp installation is over-tightening the clamp or using improper connection techniques. It is essential to remember that a ground rod clamp’s purpose is to provide a solid and low resistance electrical connection between the ground rod and the grounding conductor. In this case, less is more. Over-tightening the clamp can damage the connection, leading to loose or ineffective grounding. Moreover, improper connection techniques, such as using insufficient torque or failing to clean the grounding electrode, can also compromise the integrity of the electrical system.
To avoid these common mistakes, follow these steps:
- Ensure that the ground rod clamp is properly sized for the grounding conductor. Using an undersized clamp can result in a loose connection, while an oversized clamp may lead to over-tightening.
- Maintain proper torque specifications while tightening the clamp. Refer to the manufacturer’s instructions for the recommended torque values.
- Before connecting the clamp, thoroughly clean the grounding electrode to remove any dirt, corrosion, or oxidation. A clean surface ensures a better electrical contact.
- Apply an approved antioxidant compound to the grounding electrode and conductor surfaces before making the connection. This helps prevent corrosion and ensures a reliable connection over time.
- Securely tighten the ground rod clamp, following the manufacturer’s instructions. Avoid excessive force that could damage the equipment or connection.
By following these steps and avoiding over-tightening or improper connection techniques, you can ensure a secure and efficient ground rod clamp installation.
Ignoring Compliance With Electrical Codes And Regulations
Another critical mistake to avoid during ground rod clamp installation is ignoring compliance with electrical codes and regulations. Electrical codes and regulations exist to ensure the safety and proper functioning of electrical systems. Failing to adhere to these guidelines can lead to serious consequences, including electrical shocks, fires, and legal liabilities.
Here are some guidelines to keep in mind:
- Consult the local electrical code requirements before starting the ground rod clamp installation.
- Make sure you understand the specific code requirements for the grounding system in your area.
- Properly size the grounding conductor and ground rod clamp according to the code requirements.
- Follow any additional regulations or best practices specific to your jurisdiction or industry.
Compliance with electrical codes and regulations is essential for the safety and reliability of your electrical system. Ignoring these guidelines can result in severe consequences and potential hazards. Make sure to educate yourself on the relevant codes and regulations and ensure that your ground rod clamp installation meets all the necessary requirements.
Testing And Troubleshooting Ground Rod Clamp Installations
Get your electrical grounding system up and running with these easy steps to install a ground rod clamp. Troubleshoot and test your installations for effective electrical grounding. Improve safety and performance in your electrical systems.
Confirming The Effectiveness Of The Ground Connection Through Testing
Once you’ve successfully installed your ground rod clamp for electrical grounding, it is crucial to confirm the effectiveness of the ground connection through testing. Testing your installation ensures that you have created a reliable system to protect against electrical faults, lightning strikes, and other potential hazards. Let’s explore the easy steps to test and verify the grounding effectiveness:Step 1: Visual Inspection
Before conducting any electrical tests, visually inspect the ground rod clamp installation for any visible defects or loose connections. Ensure that the ground rod clamp is securely and tightly fastened to the ground rod with the appropriate torque.
Step 2: Ground Resistance Measurement
Measuring the ground resistance is an essential test to determine if your ground rod clamp installation is functioning effectively. You can use a ground resistance tester or an ohmmeter to perform this test. Follow these steps:
- Connect the ground resistance tester or ohmmeter to the ground rod clamp, establishing a solid connection.
- Adjust the tester to the appropriate settings for resistance measurement.
- Begin the measurement process and record the reading displayed by the tester.
If the recorded ground resistance value is within acceptable limits prescribed by local regulations and standards (typically 5 ohms or less), it confirms that your ground rod clamp installation is effective in providing a low-resistance path for electrical faults.
Troubleshooting Common Issues And Ensuring Proper Functionality
1. Inspecting Wire Connections
One common issue that may affect the functionality of your ground rod clamp installation is loose or damaged wire connections. Ensure that all wire connections are properly secured, tightened, and adequately insulated. Examine the wire connections for signs of corrosion or damage and replace any components as necessary.
2. Checking Continuity
Continuity testing is a valuable troubleshooting step to verify the uninterrupted flow of electrical current between components of the grounding system. Use a digital multimeter set to the continuity mode and test the connections between the ground rod clamp, grounding wire, and other components. If there is a break in continuity, identify and fix the issue promptly to maintain an effective ground connection.
3. Eliminating Ground Rod Rust
Rust build-up can hamper the conductivity of the ground rod, reducing the effectiveness of your grounding system. Regularly inspect the ground rod for signs of rust and corrosion, especially in areas with high moisture or salt exposure. If rust is present, clean the rod using an appropriate anti-corrosion solution and ensure a clean, metal-to-metal contact with the ground rod clamp.
By following these easy steps to test and troubleshoot your ground rod clamp installation, you can ensure that your electrical grounding system functions optimally, providing the necessary protection for your property and electrical equipment.
Credit: www.finehomebuilding.com
Frequently Asked Questions Of Easy Steps To Install Ground Rod Clamp For Electrical Grounding
How Do You Connect A Ground Rod Clamp?
Connecting a ground rod clamp is simple. First, loosen the clamp’s screw. Next, wrap the wire around the rod, ensuring good contact. Then, slide the wire into the clamp and tighten the screw firmly. Finally, check for a secure connection.
How Far Does A Grounding Rod Need To Be In The Ground?
A grounding rod needs to be driven at least 8 feet deep into the ground for effective grounding.
How Do You Ground Yourself With A Grounding Rod?
To ground yourself with a grounding rod, first, identify a suitable location near the building’s foundation. Next, dig a hole deep enough to accommodate the rod, leaving only a few inches exposed above the ground. Insert the rod into the hole and cover it with soil to secure it.
Finally, connect the grounding wire from the electrical system to the grounding rod using appropriate clamps or connectors.
What Is Nec Code For Grounding Rods?
The NEC code for grounding rods specifies the requirements for electrical grounding systems. It outlines guidelines for the installation and use of grounding rods to ensure safety and prevent electrical hazards.
Conclusion
Installing a ground rod clamp for electrical grounding is a simple process that ensures safety and protection for your electrical system. By following these easy steps, you can effectively secure the clamp to the ground rod, establishing a reliable grounding connection.
Remember to use the right tools and follow all safety precautions. With proper installation, you can enjoy peace of mind knowing that your electrical system is well grounded and protected from potential hazards. Trust the expertise of a professional electrician if you encounter any difficulties during the installation process.